This blog post (written by me, Timo) outlines the technical skills that I have developed, both online and offline, and how I developed them, in the process of our projects production.
Triangle of Exposure:
The Triangle of Exposure is a fundamental concept in cinematography and photography that involves understanding and balancing three key elements: aperture, shutter speed, and ISO. These three elements form a triangle because changes to one element necessitate adjustments to at least one of the others to maintain proper exposure. After conducting research I understood the role of each key elements with:
Aperture referring to the size of the opening in the camera lens through which light passes. It is measured in f-stops. A lower f-number (e.g., f/1.8) represents a larger aperture, allowing more light to enter. On the other hand, a higher f-number (e.g., f/16) indicates a smaller aperture, restricting light. Aperture also controls depth of field, affecting how much of the image is in focus. I then experimented to showcase this effect by using 3 objects, a lego, a plushy, and rubiks cube.
shallow depth of field (lower f-stop)
wider depth of field (higher f-stop)
Whereas, shutter speed determines the amount of time the camera's shutter remains open. It is measured in seconds or fractions of a second. A fast shutter speed (e.g., 1/1000s) freezes motion but allows less light to reach the sensor. A slow shutter speed (e.g., 1s) captures more light and introduces motion blur. Shutter speed is crucial for controlling the perception of motion in the photograph. As well as, ISO, which measures the sensitivity of the camera's sensor to light. I then experimented by recording myself moving a stick.
higher motion blur (lower shutter speed)
less motion blur(higher shutter speed)
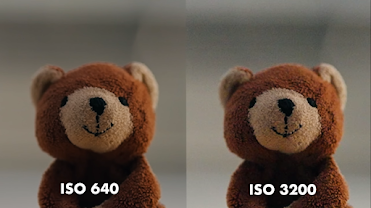
A lower ISO (e.g., ISO 100) is less sensitive and suitable for well-lit conditions, while a higher ISO (e.g., ISO 1600) increases sensitivity and is useful in low-light situations. However, higher ISO values can introduce digital noise or graininess to the image. I then experimented with recording a static teddy bear.
higher iso leads to more digital noise (grainy effect)
Balancing these three elements is essential to achieving a well-exposed photograph. Adjusting one aspect of the triangle impacts the others, and finding the right combination depends on the specific lighting conditions and desired creative effects. Learning the triangle of exposure enables me to achieve the desired creative effects and maintain proper exposure in various shooting conditions.
Physical Equipment (Reflector):
Since a large portion of our project was shot outdoors, we mainly relied on natural sunlight. This means that there would be harsh negative lighting, also known as underlighting or top-lighting, this occurs when the primary light source, which in this case is the sun, illuminates the subject from above, casting shadows on the lower part of the face or the scene. This type of lighting can create unflattering shadows under the eyes, nose, and chin, leading to a less appealing look. Knowing this, we prepared by using a reflector, however I had to learn how to use one.
reflector we used in our project (GODOX RFT-02)
the crew and I using the reflector
After conducting research I have found the most effective way to use a reflector, which is by:
Position the Reflector:
Identify the direction of the primary light source causing the negative lighting. It's typically from above, as in overhead sunlight or artificial lights.
Place the reflector on the opposite side of the light source, directing it towards the shadows on the subject.
Tilt the reflector to find the optimal angle that bounces the light onto the shadowed areas. This may involve some experimentation to get the right balance.
The reflector should be positioned in a way that it doesn't create additional harsh shadows or unwanted highlights.
It is important to note that reflectors come in different colours, silver, gold, and white. Using a silver surface will create more bright and cool tone, a gold surface creates a warmer fill, and a white surface creates a softer will where it slightly diffuses the light.
Embeding PDFs into blogger:
I've gained online skills during this project, such as integrating PDFs and presentations into Blogspot. I acquired these skills by watching tutorials on YouTube.
I then summarized it into these simple steps:
Upload PDF to Google Drive:
Share PDF
Inside Google Docs, click on "File" in the top-left corner, and select "Publish to the web."
Click on the "Embed" tab and adjust the dimensions if necessary.
Click on the "Publish" button.
Copy the Embed Code
Embed on Blogger/Blogspot:
In blogger, switch to HTML mode by clicking the "HTML" tab in the post editor.
Paste the copied embed code where you want the PDF to appear in your blog post.
Preview and Publish
Switch back to the "Compose" mode to see a preview of your embedded PDF.
Adjust the placement or dimensions if needed.
Once satisfied, click "Publish" or "Update" to save your changes.
Reflection:
Firstly, learning the triangle of exposure has allowed me to become a lot more confident in handling camera equipment. With this skill, I am now able to adapt easily to a variety of different conditions. This skill will prove to be very useful in the future. Secondly, learning how to use equipment, specifically a reflector, allows me to be more hands-on in my filmmaking process, if I were ever to direct another project I can easily teach others to handle a reflector. Learning to embed PDFs onto a website was a pivotal technical skill that significantly enhanced my capabilities. This skill empowered me to creatively present comprehensive information directly on my website, enhancing its accessibility and user experience. In conclusion, looking beyond the technical aspects, honing these skills instilled in me a sense of accomplishment, confidence in tackling challenges, and a mindset of continual learning and growth.
This blogpost contains information on how we scouted the locations along with a risk assesment of each location. Written by me (Timothy)
Locations:
As a group, we discussed potential locations that would perfectly represent fun and thrilling emotions, accompanied with a large space as we have a large cast, whilst, wanting to emphasize freedom. With this in mind we ended up choosing these locations:
Hillstone Villas Resort Bali - (Villa Scenes)
Gunung Payung Beach - (Beach Scenes)
Pecatu Graha - (Car Scenes)
Tol Bali Mandara - (Car Scenes)
Peninsula Island, Nusa Dua - (Park Scenes)
Lapangan Puputan Margarana Renon - (Park Scenes)
When coming up with these locations, we considered a variety of different factors. Firstly, for the villa scenes we knew it would be too expensive to rent out a villa for a day of shooting so we contacted Han Hyun Woo, who happens to be an actor as well as the owner of a villa resort, which is why we decided to shoot in Hillstone Villas & Resort Bali. Secondly, we considered factors such as popularity of the area because we knew that if the area was too popular it would be way too difficult to shoot in these locations as the crowd around us would disrupt the shoot. Lastly, we had to consider factors such as distance, shooting in locations at the edge of Bali would be very difficult and expensive as transportation costs would be high for fuel.
Scouting:
Through discussing and brainstorming location ideas, we all agreed that it was suitable through ideas in our mind. This means that we needed to confirm our ideas by scouting these locations, we did this and obtained images of these locations.
Hillstone Villas Resort Bali
By looking at these pictures I took, we can see that scenic views, beautiful open skies, large open grass areas, and wide pools are perfect for what we are trying to portray in our music video.
Location Assessment
Purpose of the shoot:
Music Video; them getting ready
Media Language:
Mise en scene - Natural sunlight (bright daytime), sunset
By looking at the pictures taken by Sharon, we can see that this beach is the fitting choice for shooting our beach scenes, as it isn't necessarily as crowded as other popular beaches in Bali, allowing us for more freedom to shoot the music video. It also has beautiful white sand and deep blue waters, which is perfect for our music video.
By looking at these pictures taken by Maxi, we can see that Pecatu Graha roads have wide roads with smooth asphalt, with tall green trees, and clear blue skies. This makes it the ideal location to shoot our car scenes as it will make it easier for us to shoot any follow shots from another vehicle, considering how wide the road is.
Location Assessment
Purpose of the shoot:
Music Video;
Media Language:
Mise en scene - Natural sunlight (bright daytime), sunset
Camera - Wide angle, establishing shot, drone
Sound - Laughter, music,
Editing - Warm colors
Pros of Location:
Scenic, well maintained, part of a residential areas
Cons of Location:
Privately Owned
Alternative location:
Serangan, Jalan Tol Bali Mandara
Tol Bali Mandara
By looking at the pictures taken by me (Timothy), we can see that the only highway in Bali is very unique as it is built above water which allows for beautiful shots of the scenery and sunlight reflecting off of the water. It is also very wide and clean.
Location Assessment
Purpose of the shoot:
Music Video; Car scenes
Media Language:
Mise en scene - Natural sunlight (bright daytime), sunset
Camera - Wide angle, establishing shot, drone
Sound - Laughter, music,
Editing - Warm colors
Pros of Location:
Scenic, well maintained, unique scenery
Cons of Location:
Dangerous high speed cars
Alternative location:
Serangan, Jalan Tol Bali Mandara
Peninsula Island Park
By looking at the pictures taken by Maxi, we can see that has very wide and open fields of grass, with beautiful flowers and lush trees surrounding it with a view of a mountain. Which is perfect to convey conventions of parks picnics and outdoor activities.
Location Assessment
Purpose of the shoot:
Music Video; having fun, picnic
Media Language:
Mise en scene - Natural sunlight (bright daytime), sunset
By looking at the pictures shown above, taken by Maxi, we can see that Lapangan Renon also has large and wide open grass fields. However, it is more crowded when compared to Peninsula Island due to its location in the middle of the capital city.
Location Assessment
Purpose of the shoot:
Music Video; having fun, picnic
Media Language:
Mise en scene - Natural sunlight (bright daytime), sunset
After careful consideration, we ruled out a few locations due to its risky and dangerous factors such as the Tol Mandara Road, we then decided on these locations as our final locations as it fit all the characteristics we were looking for, however, still kept an open mind to other locations as backup just in case, these locations include:
Gunung Payung Beach - (Beach Scenes)
Hillstone Villas Resort Bali - (Villa Scenes)
Peninsula Island - (Park Scenes)
Griya Alam Pecatu - (Car Scenes)
Reflection:
After scouting locations I now know it's about envisioning how the space can contribute to the storytelling. I recognize opportunities to enhance my creative vision in terms of framing, lighting, and the overall atmosphere of each location. While scouting the locations I had trouble visualizing where exactly to shoot the shots I wanted to create the perfect shot. In future projects, I want to scout more specific locations, such as where exactly our cast will be standing and acting, this can be easier to adjust what time to shoot because outdoor locations rely heavily on the direction of sunlight.
This blog post contains the developmetn of our artist for details used for our promotion package and the details of our casting choices and cast, written by me (Timothy)
Artist’s name:
We wanted our artist to come from an Asian background, so we needed a name that matched her background. We talked about some appropriate Asian girl names because how an artist's name looks is important for their branding on album covers and song titles. But since we also wanted to appeal to English-speaking audiences, we didn't want the name to be too focused on her cultural background. We initially came up with ideas that apply to the "first name - surname" format, which is common in pop music. We also tried shorter versions of these names and played with capitalizations, as these are often used as stage names for female artists in this genre. Here are a few names we came up with during our discussion:
Kiara Bel
KIARA
Isabel Tan
Isabel Kim
Isabelle
BELLE
Jasmine Wang
JMIN
伊莎贝尔
Cast Options:
Prior to creating a cast list, we made sure the shortlist applies to the characteristics of the role we want them to play.
Artist (Lead Female):
(Fun, Outgoing, and Humble)
Jasmine May Riadi
Eugene Evelina Nugroho
Elvina Laurencia Ryanto
Artist's Female Friends:
(Female, Friendly, Fun)
Elvina Laurencia Ryanto
Chelsea Graciella Liem
Eugene Evelina Nugroho
Jasmine May Riadi
Keyla Lisgianto Josono
Nayana Sumaniaka
Giann Fico Suwangsa
Leaticia Adidharma Lee
Artist’s Ex Boyfriend (Male Lead):
Han Hyun Woo
Nicholas Gerwin Mawardji
Gede Danny Putra Budiada
Screen Tests:
To make sure our actors were fit for the role, we conducted screen tests for the possible actors we want to portray the characters in our music video. The screen test is shown in this google drive link.
Conducting these screen tests allowed us to finalize the cast after considering their different skills in acting, personalities, and accessibility. The final cast includes:
Artist (Lead Female):
Jasmine May Riadi
Artists Girl Friends:
Elvina Laurencia Ryanto
Chelsea Graciella Liem
Eugene Evelina Nugroho
Keyla Lisgianto Josono
Leaticia Adidharma Lee
Artist’s Ex Boyfriend (Male Lead):
Han Hyun Woo
Reflection:
After choosing our cast, I recognize the need to actively promote diversity and inclusion in casting decisions. By consciously seeking a variety of talents and perspectives. Finalizing the cast helped us ensure the quality of our portrayal of our certain representations. Furthermore, we need the final cast to have good chemistry with each other, which is why we chose a cast that has known each other for a long time. Choosing a cast with good chemistry will make it easier for us to make our music video seem more natural and lively. Conducting screentests also helped us in being more confident in our final choice, choosing someone that knows how to perform in front of a camera with confidence, was something that I didn't really consider prior to this, it will be far more beneficial to choose someone that knows how to perform rather than choosing someone who just looks the part.
This post contains a mood board which contains a compilation of images to represent a theme and colour scheme we want to use for our project. Written by me (Timothy)
This moodboard displays fun and exciting activities. We chose these pictures to display in our mood board as the song we chose talks about life after a breakup from a female's perspective, talking about how life feels 'lighter' after letting go. This mood board reflects that by using bright colours and fun activities. This allows the audience to relate more as they might enjoy the same activities, such as, flying kites, going out for picnics, and having sleepovers.
Reflection: During the creation of this mood board, I suggested a colour pallette that can best reflect the message we are trying to convey. Furthermore, I also helped in choosing the pictures fit for this mood board. Overall the creation of this mood board helped our team think more creatively and helped us with time-management. In the future, I would like to create a moodboard that looks more professional, maybe using a certain template because the current one looks quite messy with no structure.


.jpeg)


